Adding fonts for one user only without admin rights on MS Windows
Posted: February 5, 2020 Filed under: LibreOffice, MS Office, Solutions, Tips, Uncategorized, Windows Leave a commentSo, you are using a MS Windows machine. You need to add a new font to your document, as those already present do not satisfy your needs. But you have one problem – you are not the Administrator, you lack the necessary admin permissions to access Windows system folders, so there is no way you can install fonts the standard way.
If you google it up, you get a lot of sites telling you that adding fonts as a regular user in Windows is not possible. Well, that is false…
Adding custom fonts for a particular user in Windows is actually quite simple. It isn’t as simple as it is in Linux, but still simple enough.
There are two basic steps:
- Copy font files into the user font directory
- Add their names and paths to the Windows registry
For example:
Let us assume our user is called “myusername”.
- See if the following directory exists, create it if it doesn’t:
C:\Users\myusername\AppData\Local\Microsoft\Windows\Fonts - Go get the font. Let’s say we want to have all variants of “Roboto”. We go to Google Fonts , select the font, customize the download by selecting extra variants, then download it as a single ZIP archive.
- Create a sub-directory for the font family, “Roboto” in this case:
C:\Users\myusername\AppData\Local\Microsoft\Windows\Fonts\Roboto - Unpack all contents of the downloaded ZIP into the newly created sub-directory.
It is a matter of convenience to group the fonts by their family name and store them in separate sub-directories, it is not mandatory. As well you can dump them all together in the Fonts directory.
So far so good. The font files are there but they will stay invisible to MS Windows.
- Go to Start->Run and start registry editor by running regedit
- Navigate to the key:
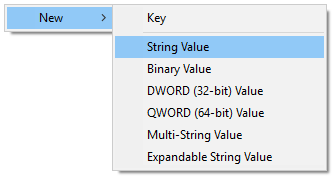
HKEY_CURRENT_USER\Software\Microsoft\Windows NT\CurrentVersion\Fonts - Right-click your mouse and add a new String Value.

- Give it the name as you would like to see it in the drop-down font list in your application, for example “Roboto” or “Roboto Regular” (This will be known as the “value name”), and press enter.
- Double-click the newly created record and enter full path to the font file (This will be the “value data”). In our example it will be:
C:\Users\myusername\AppData\Local\Microsoft\Windows\Fonts\Roboto\Roboto-Regular.ttf
At this point you shall be able to use the Roboto Regular font after a system restart.
If you want, you can add other members of the family to the registry in the same way.
Tested on MS Windows 10 Enterprise (64 bit).
Kill a process from the command line in Windows
Posted: July 5, 2018 Filed under: Errors, Solutions, Tips, Windows Leave a commentYou can kill (end, terminate) a process (task, program, application) in Windows in a way that is similar to the way it is done in Linux.
Start cmd.exe, e.g.:
- Start -> Run -> cmd
In the terminal window that pops up at the prompt type:
- tasklist
Look for the PID of the process you want to terminate and use the following command to ask it nicely to quit:
- taskkill /PID <your PID here>
If you were lucky, the process will terminate. If it doesn’t, use force:
- taskkill /PID <your PID here> /F
Run a process in VirtualBox from outside
Posted: November 1, 2017 Filed under: Linux, Scripting, Solutions, Tips, Ubuntu, VirtualBox, Windows Leave a commentYou can launch a program within an Oracle VirtualBox virtual machine from the host system’s command prompt.
Example 1: Run notepad in MS Windows 7 virtual machine named “7” as user “user” with password “1” from Ubuntu:
-
VBoxManage guestcontrol "7" run --exe "C:\\Windows\\notepad.exe" --username user --password 1
Example 2: Output guest network info:
-
VBoxManage --nologo guestcontrol "7" run --exe "c:\\windows\\system32\\ipconfig.exe" --username user --password 1 --wait-stdout
Notes:
- You must have Guest Additions installed
- The user account must have a password
Input line is too long
Posted: September 23, 2017 Filed under: Errors, Scripting, Windows Leave a commentSo you create a .bat file with a long list of arguments and it fails with a message:
“the input line is too long”
To avoid this, split your long single line into multitude of shorter lines separated by the caret character to mark the line break. Like this:
echo 1^
 2^
 3
Windows 10 icon PNG
Posted: September 5, 2016 Filed under: Graphics, Linux, Solutions, Ubuntu, VirtualBox, Windows Leave a commentA 48×48 pixel PNG icon for use with Linux desktops.
Can be used to start a virtual machine with MS Windows 10 inside.

Windows 10 icon, PNG, 48×48 pixels
Get Windows XP network information on command line
Posted: April 1, 2015 Filed under: Solutions, Tips, Windows Leave a commentTo display or set Windows XP network parameters (IP address, default gateway, DNS servers used, routing etc.) from the command line use netsh utility.
To see the list of options type:
-
netsh /?
Access denied in SAMBA with symlinks
Posted: February 17, 2015 Filed under: Errors, Linux, Solutions, Tips, Ubuntu, Windows Leave a commentProblem:
SAMBA clients attempt to access symbolic links pointing to directories outside of the particular share, but get “Access is denied” error.
Cause:
By default SAMBA now does not allow such symbolic links for safety reasons.
Solution:
Add these two lines to your smb.conf
wide links = yes
unix extensions = no
The first one enables full symlink support, the other one disables an option conflicting with it.
Skip creating Microsoft account in Windows 8.1
Posted: January 23, 2015 Filed under: Solutions, Tips, Windows Leave a commentYou may feel that Microsoft is forcing you into signing up for a Microsoft account and sharing your data in order to be able to activate Windows 8.1.
Everything in the setup screens seems to be made to lure the user into signing up with Microsoft.
But actually there is an alternative for the old good local user account, only that this option is hidden well enough in the small print several screens down, too far away for the average user to even notice it’s there.
- When you see “Next you’ll set up your account” and then “Sign in to your Microsoft account”, select “Create a new account”.
- Then, at the screen “Create a Microsoft account” select “Sign in without a Microsoft account”.
- Configure a normal local user account in the old fashioned way.
Some bells and whistles of the Windows may lack functionality, but its up to you to decide if you need them.
Anyway, you can create a Microsoft account later, if you decide that you need one.
Lenovo B50-70 factory reset from recovery partition
Posted: January 23, 2015 Filed under: Errors, Hardware, Solutions, Tips, Windows 32 CommentsTo run a factory reset of Lenovo B50-70 from the hidden recovery partition:
- Switch off the laptop.
- Look for a small pinhole at the right side of the laptop, between the single USB port and the CD-DVD drive, closer to the USB port.
At the first glance you may miss it, thinking that it is a kind of a LED indicator or even a miniature socket for earphones, as the OneKey Recovery symbol is very small and reminds of the headphone symbol. - Take a pointy object, preferably non-conductive one, e.g. a toothpick, insert it into the pinhole and gently push it. You will feel the miniature switch click. Keep pressed for about 2 seconds, then release and wait.
The laptop then will switch on and boot into the special “Novo Button Menu” (it’s those marketing people again…). - Select the “System Recovery” option and proceed in accordance to the instructions on screen.
P.S.
I just wonder why those geniuses at Lenovo could not think of providing a simple and clear information on where to find the reset button. You can spend half a day reading manuals and calling up tech support, before you find it out all on your own.
It said nothing about the pinhole in any of the Lenovo manuals I read and the only information about it at the laptop itself was a marketing sticker boasting this function, without telling how exactly to activate it, only warning that “Some features are only available while running Microsoft Windows”, which does not help you much when your Windows has become unusable.
Go figure…
Change file permissions from command line in Windows Server
Posted: October 2, 2014 Filed under: Solutions, Tips, Windows Leave a commentTo grant full permissions to a directory named Invoices and everything within it to a user named JOHN, run cacls like this:
-
cacls Invoices /T /E /P JOHN:F
P.S.
If you need to do this as a different user, read this.
