Fluke digital thermometer digits do not show up
Posted: September 18, 2022 Filed under: Uncategorized Leave a commentYou take your Fluke digital thermometer, press the button, the display lights up but shows no readings – the digits just do not show up.
Even so – the digits do not show up – you try to use it on another day and they actually do show up and everything works just fine – but then again, a day or two later they are gone. You press the button, the display backlight goes on, but the display remains blank.
Well, the solution is extremely easy – just replace the battery.
My guess is that the power remaining in the battery is so low, that it is enough to turn on the display backlight LED but not enough to operate the thermometer circuit.
Set default screenshot directory in Linux Mint
Posted: May 19, 2022 Filed under: Uncategorized Leave a commentSet the directory whereto screenshots are saved by default:
gsettings set org.gnome.gnome-screenshot auto-save-directory ~/Pictures/Screenshots
Seek Thermal Compact, Samsung a21s, micro USB to USB-C adapter
Posted: December 15, 2020 Filed under: Errors, Hardware, Lifehacks, Solutions, Tips, Uncategorized Leave a commentSo you have your Seek Thermal Compact thermal USB camera with its micro USB type B male plug. As the time flies by, you buy a new smartphone, Samsung a21s it is, and it does have the new USB-C rotationally symmetrical connector socket. And you buy a micro USB to USB-C adapter, and you plug it all in, and it does not work.
Well.
It sucks, doesn’t it? But that type of thing happens. It is to be expected. Maybe the next adapter you buy will work. Or the next. Or the one after that. Right?
But!
It turns out that not all is lost yet. It turns out that the sequence of plugging in the components in matters! Who would have expected that, right?
What you do, is you plug in the adapter into the phone first, and only then you plug the camera into the adapter. Voila! Everything now works just fine!
You even can turn the micro USB to USB-C adapter around its axis by 180 degrees, plug it in, and you still have your Seek Thermal Compact camera working, even though it is looking in the opposite direction now. How nice is that?
Probably, as some people are suggesting, USB-C sockets of the new smartphones have current so weak, that it can’t wake up the camera if it has the bulk of the adapter already attached to it, so the camera remains undetected.
The particular adapter successfully tested was the small and neat Fusion Accessories Adapter Micro USB to USB Type-C Black, item code 695208 (whatever that means), priced around 3.00 EUR. It is OTG capable and it clearly says so on the packaging.
NB! Beware of the adapters and adapter cables neither labelled as OTG capable nor listed online as such. Not having OTG label plastered all over it does not necessarily mean that the adapter can’t do OTG, but it somewhat reduces the chances. And if in a situation like this it does not work, it will leave you guessing – was it the physical properties of the adapter that prevented it from working in the particular setup, or it indeed is just a dumb charging cable with no OTG capability whatsoever to begin with.
Switch video output to another monitor from command line
Posted: July 24, 2020 Filed under: Mint, Solutions, Tips, Ubuntu Leave a commentSo, you have two video outputs. The first is DisplayPort (eDP). The actual monitor sits on the second video output, which is HDMI. For some reason your Mate desktop sends all the panels and icons to the first output, where you can’t actually see them. The monitor shows you only pristinely clean desktop wallpaper coming from the second video output.
Solution:
- Find out what displays your system thinks it has:
xrandr --listmonitors
The result will be something like this:
0: +*eDP-1 1920/508x1080/286+0+0 eDP-1
1: +HDMI-1 1920/480x1080/270+1920+0 HDMI-1
- Then tell it that the second monitor is the primary one, where you want all your user interface widgets to be:
xrandr --output HDMI-1 --primary
Adding fonts for one user only without admin rights on MS Windows
Posted: February 5, 2020 Filed under: LibreOffice, MS Office, Solutions, Tips, Uncategorized, Windows Leave a commentSo, you are using a MS Windows machine. You need to add a new font to your document, as those already present do not satisfy your needs. But you have one problem – you are not the Administrator, you lack the necessary admin permissions to access Windows system folders, so there is no way you can install fonts the standard way.
If you google it up, you get a lot of sites telling you that adding fonts as a regular user in Windows is not possible. Well, that is false…
Adding custom fonts for a particular user in Windows is actually quite simple. It isn’t as simple as it is in Linux, but still simple enough.
There are two basic steps:
- Copy font files into the user font directory
- Add their names and paths to the Windows registry
For example:
Let us assume our user is called “myusername”.
- See if the following directory exists, create it if it doesn’t:
C:\Users\myusername\AppData\Local\Microsoft\Windows\Fonts - Go get the font. Let’s say we want to have all variants of “Roboto”. We go to Google Fonts , select the font, customize the download by selecting extra variants, then download it as a single ZIP archive.
- Create a sub-directory for the font family, “Roboto” in this case:
C:\Users\myusername\AppData\Local\Microsoft\Windows\Fonts\Roboto - Unpack all contents of the downloaded ZIP into the newly created sub-directory.
It is a matter of convenience to group the fonts by their family name and store them in separate sub-directories, it is not mandatory. As well you can dump them all together in the Fonts directory.
So far so good. The font files are there but they will stay invisible to MS Windows.
- Go to Start->Run and start registry editor by running regedit
- Navigate to the key:
HKEY_CURRENT_USER\Software\Microsoft\Windows NT\CurrentVersion\Fonts - Right-click your mouse and add a new String Value.
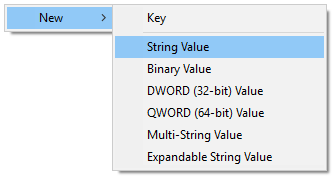
- Give it the name as you would like to see it in the drop-down font list in your application, for example “Roboto” or “Roboto Regular” (This will be known as the “value name”), and press enter.
- Double-click the newly created record and enter full path to the font file (This will be the “value data”). In our example it will be:
C:\Users\myusername\AppData\Local\Microsoft\Windows\Fonts\Roboto\Roboto-Regular.ttf
At this point you shall be able to use the Roboto Regular font after a system restart.
If you want, you can add other members of the family to the registry in the same way.
Tested on MS Windows 10 Enterprise (64 bit).
Make Postfix use /etc/hosts
Posted: July 31, 2019 Filed under: Errors, Linux, Networking, Solutions, Tips, Ubuntu Leave a commentTo make Postfix use /etc/hosts file to find IP address of the SMTP server before it contacts any DNS servers, add two lines to the /etc/postfix/main.cf file:
- lmtp_host_lookup = native
- smtp_host_lookup = native
Restore the missing DataTables search reset button in Bootstrap
Posted: May 25, 2019 Filed under: Bootstrap, CSS, DataTables, JavaScript, Scripting, Solutions, Tips Leave a commentIf you are using DataTables with Bootstrap, you may be missing the reset button in the search control in your table. The Bootstrap styling is to blame for it.
You can bring the reset button back by adding this to your CSS:
input[type="search"]::-webkit-search-cancel-button {
    -webkit-appearance: searchfield-cancel-button;
}
TCPDF ERROR: Could not include font definition file (SOLVED)
Posted: March 12, 2019 Filed under: Errors, Graphics, PHP, Solutions Leave a commentWhen using TCPDF_FONTS::addTTFfont(), everything seems all right, but you can’t get TCPDF to use the custom TTF fonts. You read online that the problem may be with the fonts directory, so you change permissions on all your TTF font directories, but nothing changes, you are still greeted with the message:
TCPDF ERROR: Could not include font definition file
Well. The problem actually is with the TCPDF fonts directory, not with the system TTF fonts directory
A quick and dirty, and probably not entirely safe solution to the problem is to grant write permissions to everyone on the TCPDF fonts directory, so that TCPDF can write the freshly generated font definition files to it:
- sudo chmod ugo+w /usr/share/php/tcpdf/fonts
See disk usage from command line
Posted: October 12, 2018 Filed under: Linux, Mint, Tips, Ubuntu Leave a commentFrom the command line to see which directories are using most of the space on your disk (root / as an example here):
- du -h / | grep ‘[0-9\,]\+G’
Starting Android emulator from command line
Posted: October 10, 2018 Filed under: Android, Cordova, Solutions, Uncategorized Leave a commentIf you have Android Studio installed, but you do not want to run the whole IDE just to start the Android emulator, you can start the emulator alone directly from the command line.
If you do not remember exactly the name of the virtual device you want to run, you can list all available devices by:
-
emulator -list-avds
When you know the name of the system image, start it like this, prepending the machine name with -avd or @ :
- emulator @Nexus_5X_API_27
If you encounter an error message like “Could not launch” … “qemu-system-i386” … “No such file or directory”, something may be wrong with your path. The quick and dirty solution is to change into the emulator subdirectory of Android/Sdk, where the emulator executable lives, and run the command from there.
If it still fails you may be having a 64 bit system which is not configured to run 32 bit executable code.
To fix that, run:
- sudo dpkg –add-architecture i386
- sudo apt-get update
- sudo apt-get install libc6:i386 libncurses5:i386 libstdc++6:i386
